Introduction
This tutorial describes the options and commands available for dimensioning drawings and how to use them. The correct use of AutoCADs dimension tools is the key to producing clear and concise measured drawings. If you just need to quickly find a description of the various dimension commands, click on the appropriate button on the QuickFind toolbar below.AutoCAD provides lots of control over the way dimensions look. Using a system similar to text styles, dimension styles allow you to design dimensions so that they look just the way you want them to.
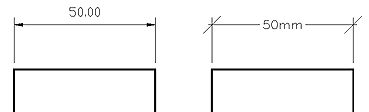 For example, the illustration above shows two different dimension styles. The one on the left is the default style known as STANDARD. If you do not create a style of your own or modify the standard style, all dimensions will look like this. The dimension line has arrow heads and the dimension text is positioned above the line and is drawn using the current text style. The dimension on the right has been drawn using a new style. The arrows have been changed to obliques, the vertical alignment of the text has been centred and the current text style has been changed.
There are lots of dimension commands which include facilities for indicating tolerances and alternate units dimensioning. However, this tutorial aims to cover the most common commands for general use and constitutes an introduction to dimensioning with AutoCAD. If you would like to learn more about dimensions, refer to the AutoCAD user manual.
AutoCAD divides dimensions into four main categories: Linear, Radial, Ordinate and Angular. For the purposes of this tutorial we will only consider some of the commands within the Linear, Radial and Angular categories.
When you create dimensions, AutoCAD automatically creates a new layer called "Defpoints". This is a special layer which cannot be deleted or renamed. AutoCAD uses this layer to store dimension information and you can effectively ignore it.
When working with dimensions it is very important that line origins are picked accurately so that the resulting measurement and text are correct. Always use an Osnap to pick dimension line origins. If you have a lot of dimensioning work to do, it will be worth using a running Osnap. Running object snaps are set using the Osnap Settings dialogue box. To display this dialogue box type DDOSNAP at the keyboard or select Tools
This tutorial is not designed as a reference for dimensioning conventions. If you wish to learn more about dimensioning conventions, consult BS 308: Part 2.
Selecting Dimension Commands
 Selecting and working with the dimension commands in AutoCAD R14 is much easier than in previous versions. All commands can be accessed from the keyboard and now most commands are also available from the Dimension pull-down menu and the Dimension toolbar. The Dimension toolbar is particularly useful because it places all the dimension commands a single mouse click away. Since the Dimension toolbar is not displayed by default you will need to enable it from the Toolbars dialogue box. To display the Toolbar dialogue box, select View
The Linear Dimension Commands
As the name suggests the Linear dimension commands are used to dimension along straight lines. There are five linear dimension commands, namely: DIMLINEAR, DIMCONTINUE, DIMBASELINE, DIMALIGNED and DIMROTATED. The DIMLINEAR command is probably the most common dimension command you will use.The Linear Dimension Command
| Toolbar | |
| Pull-down | Dimension |
| Keyboard | DIMLINEAR |
 You can use this command to generate horizontal and vertical dimensions.
Creating a linear dimension is easy. All you have to do is start the command, specify the two points between which you want the dimension to be drawn and pick a point to fix the position of the dimension line. Consider the diagram (right) whilst working through the following examples.
Command Sequence
Command: DIMLINEARFirst extension line origin or press ENTER to select: (pick P1)
Second extension line origin: (pick P2)
Dimension line location (Mtext/Text/Angle/Horizontal/Vertical/Rotated): (pick a point to position the dimension line, you will see the dimension rubber banding)
You may have noticed that the first prompt asks you to pick the first extension line origin or to press the ENTER key. Pressing the Enter/Return key results in the following prompt:
Select object to dimension:
 AutoCAD allows you to dimension an object simply by picking it. Try this out. Draw a line or a circle and use this option rather than the two point option to see what happens.
Dimensions will automatically adjust themselves to accommodate most situations. For example, the illustration on the right shows what happens to a dimension if the gap between the two extension lines is too small for the dimension text.
The Continue Dimension Command
| Toolbar | |
| Pull-down | Dimension |
| Keyboard | DIMCONTINUE |
Command Sequence
Command: DIMCONTINUESpecify a second extension line origin or (Undo/<Select>): (pick P3)
Specify a second extension line origin or (Undo/<Select>): (pick another or
Note: There is no prompt for the first line origin, AutoCAD automatically selects the second line origin of the previous dimension to be the first of the new dimension. There is also no prompt for the dimension line position, AutoCAD automatically matches up with the previous dimension.
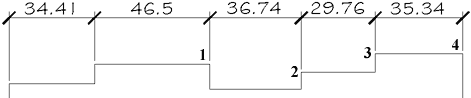 Using the Continue command you can very quickly generate a string of dimensions which align perfectly. In the example above, the "34.41" dimension was drawn with the DIMLINEAR command; all the other dimensions were drawn using the DIMCONTINUE command and simply picking the four points, one after the other. You can only continue a dimension in a single direction. To generate the "26mm" dimension in the previous illustration, you will need to use the DIMLINEAR command and pick P3 and P4 or enter
 The Baseline Dimension Command
| Toolbar | |
| Pull-down | Dimension |
| Keyboard | DIMBASELINE |
Command Sequence
Command: DIMBASELINESpecify a second extension line origin or (Undo/<Select>): (pick next point)
Specify a second extension line origin or (Undo/<Select>): (pick another or
Select base dimension: (
 In the example above, the "35.07" dimension was created using the DIMLINEAR command. The others were created using DIMBASELINE and picking points 1 and 2.
The Aligned Dimension Command
| Toolbar | |
| Pull-down | Dimension |
| Keyboard | DIMALIGNED |
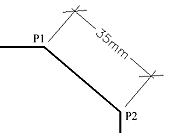 You can use this command to generate aligned dimensions. These are dimensions along inclined lines which cannot be dimensioned with the DIMLINEAR dimension command because that command will only give a measured dimension in either a horizontal or vertical direction. However, as you can see from the command sequence below, this command works in exactly the same way.
Command Sequence
Command: DIMALIGNEDFirst extension line origin or press ENTER to select:(pick P1)
Second extension line origin: (pick P2)
Dimension line location (Mtext/Text/Angle): (pick a point)
The DIMCONTINUE and DIMBASELINE commands can both be used in conjunction with DIMALIGNED dimensions.
Changing the Text
You may have noticed that when you are prompted to pick the dimension line location you are also offered a number of options. The options vary depending upon the particular command that you are using. However, the Mtext and Text options, which are common to all dimension commands are particularly useful. Essentially they do the same thing, they allow you to change the text which will appear on the dimension line. The Text option allows you to enter a single line of text and the Mtext option starts the MTEXT command and enables you to add formatted, multiline text to the dimension. These options can be used to add descriptions to your dimensions or to modify the measured distance. In the example above, the Mtext option has been used to create a multi-line annotation. When you use this option you will notice that the Multiline Text Editor dialogue already has some text in the text window. This is the measured dimension and is displayed as "<>". If you delete this marker the dimension measurement will not appear in the annotation.
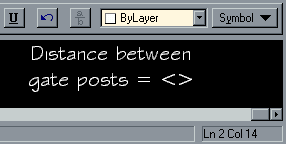 If you need to edit dimension text after the dimension is drawn, you can use the DDEDIT command, Modify/Object/Text… from the pull-down. If you select a dimension, the Multiline Text Editor will appear and you can make any necessary changes to the annotation. The illustration on the right shows an extract from the Multiline Text Editor as it would appear if the dimension above were selected.
The Radial Dimension Commands
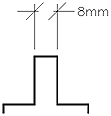
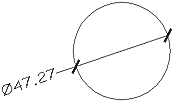
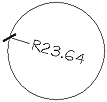
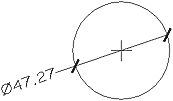
 There are two main radial dimension commands, DIMDIAMETER and DIMRADIUS. Both commands result in a similar looking dimension so AutoCAD automatically inserts a "R" to indicate a radius and the dimension symbol to indicate a dimension. You can get AutoCAD to display the dimension symbol by including "%%c" in any text string. For example, in order to draw the 40mm diameter text as it is shown in the illustration on the right, you would need to type "%%c40mm". You can use this special character with any of the text commands.
The Diameter and Radius commands are supplemented by the DIMCENTER command which can be used to add a center mark to any circle or arc. The DIMDIAMETER and DIMRADIUS commands do not automatically draw a center mark.
By convention it is usual to dimension full circles using a diameter and arcs (partial circles) using radius. You will find more information on dimensioning conventions in BS 308: Part 2.
The Diameter Dimension Command
| Toolbar | |
| Pull-down | Dimension |
| Keyboard | DIMDIAMETER |
Command Sequence
Command: DIMDIAMETERSelect arc or circle: (pick the circumference P1)
Dimension line location (Mtext/Text/Angle): (move the cursor until you are happy with the text position and then pick to complete the sequence)
The Radius Dimension Command
| Toolbar | |
| Pull-down | Dimension |
| Keyboard | DIMRADIUS |
Command Sequence
Command: DIMRADIUSSelect arc or circle: (pick the circumference P2)
Dimension line location (Mtext/Text/Angle): (move the cursor until you are happy with the text position and then pick to complete the sequence)
Notice that in the illustration above the radius dimension has been positioned inside the circle. Both diameter and radius dimensions can be positioned either inside or outside an arc or circle.
Practice with the Radial and Diameter commands until you understand how they work.
The Center Mark Command
| Toolbar | |
| Pull-down | Dimension |
| Keyboard | DIMCENTER |
Command Sequence
Command: DIMCENTERSelect arc or circle: (Pick the circumference of a circle or arc)
A cross is drawn at the center point.
Angular Dimensions
There is only one command in this section and it is used to annotate angular measurements.The Angular Dimension Command
| Toolbar | |
| Pull-down | Dimension |
| Keyboard | DIMANGULAR |
Command Sequence
Command: DIMANGULARSelect arc, circle, line, or press ENTER: (pick a line)
Second line: (pick another line)
Dimension arc line location (Mtext/Text/Angle): (pick point)
Move the cursor position until you are happy with the result. Notice that you can move the cursor to either side of the lines and the angular dimension will change accordingly.
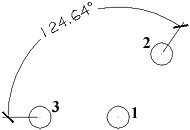 You may have noticed that at the first prompt you are given the option to press ENTER. If you use this option you will be prompted to pick the angle vertex and then the two angle endpoints. This is quite useful if the angle you need to dimension is not defined by physical lines on the drawing. The illustration on the right shows the result of this option. The centre point of circle 1 was picked as the angle vertex and the centre points of circles 2 and 3 were picked for the two angle endpoints.
The degree character is automatically inserted for you, however, if you ever need to type it, you can do so by typing "%%d". This is another of AutoCADs special characters.
Ordinate Dimensions
Ordinate dimensions are not really dimensions at all in that they do not indicate a measurement. Rather they annotate known co-ordinate points. The DIMORDINATE command is used to indicate the X and Y ordinate values at any point.The Ordinate Dimension Command
| Toolbar | |
| Pull-down | Dimension |
| Keyboard | DIMORDINATE |
Command Sequence
Command: DIMORDINATESelect feature: (pick the point to annotate)
Leader endpoint (Xdatum/Ydatum/Mtext/Text): (pick endpoint or use one of the options)
By default a vertical leader will display the X ordinate and a horizontal one will display the Y ordinate. However, you can use the Xdatum and Ydatum options to override this default.
 |  |
| Ordinate Default | Ordinate Ydatum |
Annotation with Leaders
Ordinate dimensions are not really dimensions at all in that they do not indicate a measurement. Rather they annotate known co-ordinate points. The DIMORDINATE command is used to indicate the X and Y ordinate values at any point.The Leader Command
| Toolbar | |
| Pull-down | Dimension |
| Keyboard | LEADER |
Command Sequence
Command: LEADERFrom point: (pick the point to annotate)
To point: (pick vertex point)
To point (Format/Annotation/Undo)<Annotation>: (pick end point)
To point (Format/Annotation/Undo)<Annotation>:
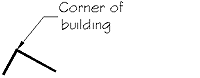
Annotation (or press ENTER for options): Corner of
MText: building
MText:
Unlike other dimension commands the leader and annotation text are drawn as separate objects. So, if you need to move or edit the text, you can do so without affecting the leader line.
As you can see by the command line, there are a number of options with this command including "Format" options which include "Spline". Experiment with these options until you understand them.
Editing Dimensions
The dimension edit commands, DIMEDIT and DIMTEDIT are used primarily to adjust the position of the text part of a dimension. This is usually only necessary if the drawing is quite complex and the dimension would read more clearly if it were in a different position.The Dimension Text Edit Command
| Toolbar | |
| Pull-down | Dimension |
| Keyboard | DIMTEDIT |
 The command can be used to position the text dynamically (this is the default)or one of the options can be used for a specific type of movement. For example, the dimension shown on the right has been modified by dynamically moving the position of the text and then the text has been rotated using the Angle option.
Command Sequence
Command: DIMTEDITSelect dimension: (pick the dimension you want to edit)
Enter text location (Left/Right/Home/Angle): (pick a new position or use an option)
The results of the four available options are shown in the illustration below.
 The Left option moves the text to a left justified position within the dimension.
The Right option moves the text to a right justified position within the dimension.
The Home option returns the text to the home position after it has been modified.
The Angle option enables the text to be rotated about its center.
The Dimension Edit Command
| Toolbar | |
| Pull-down | Dimension |
| Keyboard | DIMEDIT |
Command Sequence
Command: DIMEDITDimension Edit (Home/New/Rotate/Oblique) <Home>: (choose an option)
Select objects: (pick one or more dimensions)
Select objects: (pick more or
The command sequence will vary depending upon which option has been chosen but the results of the various options are illustrated below.
 The Home option returns dimensions to their home position.
The New option displays the Multiline Text Editor. The changes you make to the text will be applied to all selected dimensions so it is important not to delete the "<>" marker from the text string. Deleting this marker will remove the values from all selected dimensions.
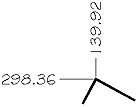
 The Rotate option can be used to rotate dimension text about its center point. It works in exactly the same way as the Angle option of the DIMTEDIT command except that you can rotate any number of dimensions at once.
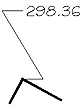
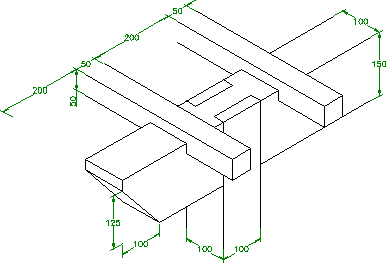
The Oblique option is used to set the dimension lines at an angle. This option can be very useful when you are dimensioning a drawing in isometric projection (see the illustration on the right). In this case the drawing has been dimensioned using the Aligned command and then the oblique angle modified to suit the dimension position. This usually means setting an angle of 30, 330 or 90 degrees depending upon the dimension orientation. If you are creating details in isometric projection make sure you are using the isometric snap/grid option for greater efficiency. For more information on drawing in isometric projection and the use of the isometric snap grid.
Dimension Styles
Dimension styles are the main method used to control the way dimensions look. Using styles you can change the text font, the arrow head style, the relative position of the text, the scale of dimensions and many other parameters. Styles are created using the DIMSTYLE command.Dimension styling is a relatively complex area of AutoCAD and the finer points are beyond the scope of this tutorial. However, the main points which will enable you to create clear, good looking styles are set out below.
The Dimension Style Command
| Toolbar | |||
| Pull-down | Dimension | ||
| Keyboard | DDIM | short-cut | D |
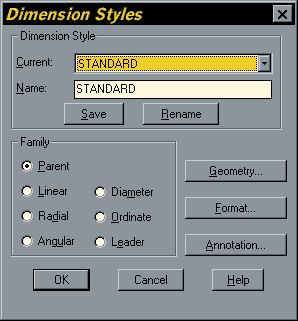 The Dimension Style command can be used to change the appearance of dimensions. The best method is to create a new style before you start creating dimensions so that you can leave the STANDARD style as a default option. Having created a new style from STANDARD you can then apply any modifications you generally require to the parent style and then more specific modifications to the child styles in order to create a style family.
Dimension styles are created using the Dimension Styles dialogue box. The dialogue box is shown on the right. As you can see from the dialogue box, a style is applied to a family of dimensions. By default, any style changes are made to the parent. Each style parent has six child styles. The child styles, Linear, Radial, Angular, Diameter, Ordinate and Leader can be used to modify the parent style when that particular type of dimension is used. For example, you may like to use a tick rather than an arrow head for your dimensions but this isn't really appropriate for a leader, so the Leader child style can be changed so that leaders will always be drawn with an arrow head whilst all other dimensions of the same style family are drawn using ticks.
Creating a new style
To create a new dimension style, make sure the STANDARD style is the current style, click in the Name edit box and type the name of the new style you wish to create. Click the Save button. You will see a message in the lower left corner of the dialogue box which says "Created name from STANDARD" where name is the new style name which you typed. The new style is automatically set as the current style. You may rename the new style if you wish, simply by typing a new name in the Name edit box and clicking on the Rename button.The new style which you have created is identical to the STANDARD style, so you must now modify your new style so that it can be used to create dimensions which conform to your own requirements. Style changes are made in three categories, Geometry, Format and Annotation. As you can see from the Dimension Styles dialogue box, each category is represented by a button which leads to a dialogue box which is used to modify the settings in that particular category.
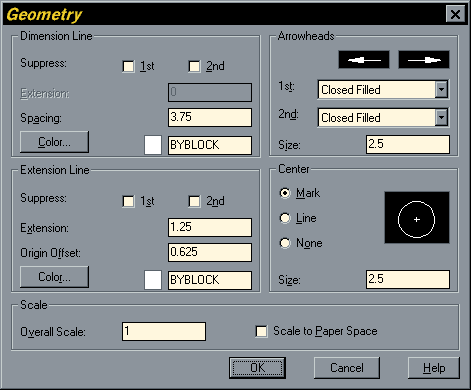
Setting the Arrow Head Type
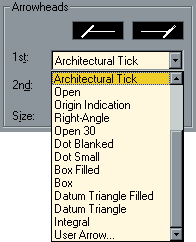 The style of arrow heads is set using the Geometry dialogue box, illustrated above. As you can see, the STANDARD style has Closed Filled arrow heads as a default.To change the arrow head style for a new dimension style, make sure the style is current and that the "Parent" radio button is selected (this assumes you are not modifying a child style), click on the "Geometry…" button and select a new arrow head type from the "1st" drop-down list.
Once selected the new arrow type is illustrated in the dialogue box. If you require different arrow heads at each end of your dimensions you can set the other type using the "2nd" drop-down list. Click on "OK" to return to the Dimension Styles dialogue box.
Dimension Scale
When you are working with drawings which will be plotted at different scales, you will need some way of changing the scale of the dimension lines relative to your drawing so that they always appear the same size, irrespective of plotting scale. You can achieve this by using the Scale variable. This option is also available from the Geometry dialogue box. The default value is set to 1.0. The larger the value the larger the dimension will appear. For example, a value of 2.0 would double the text height and the arrow size. To change the scale of dimensions, simply type the required scale in the "Overall Scale" edit box. Try changing the scale factor and check the results. The scaling applies to individual styles, so you could create different styles with different dimension scales to be used for different plotting scales.Note that changing the scale of dimensions does not affect the dimension value, this is always calculated in drawing units.
Setting the Text Location
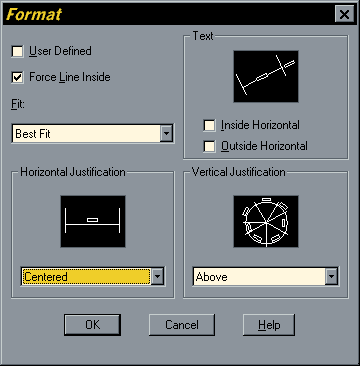 To change the text location click on the "Format…" button in the Dimension Styles dialogue box. The Format dialogue box is shown below. By default the horizontal justification is set to "Centred" and the vertical justification to "Above". This means that the dimension text will appear centred above a horizontal dimension line and centred left of a vertical dimension line. To have the text centred within the dimension line, click on the down arrow of the "Vertical Justification" pull-down list to reveal the options and click on "Centered". The illustration changes to reflect your choice. Click on "OK" to return to the Dimension Styles dialogue box. You can see the result of this action by looking at the illustration below. Experiment with the Horizontal Justification and Vertical Justification options to see what results they give.
You can also use Text the option in this dialogue box to change the text orientation in aligned dimensions. By default all dimension text is aligned with the dimension. This option allows you to force text to appear horizontal, irrespective of the orientation of the dimension. You have independent control over dimension text which appears inside and outside of the dimension lines.
 The illustration on the left shows a dimension with vertical justification set to "Above" (far left) and to "Centred" (near left).
Setting Text Style and Units
Text style and units are both set using the Annotation dialogue box, illustrated below. To set a text style to a dimension you must first have created the style using the Text Style command (Format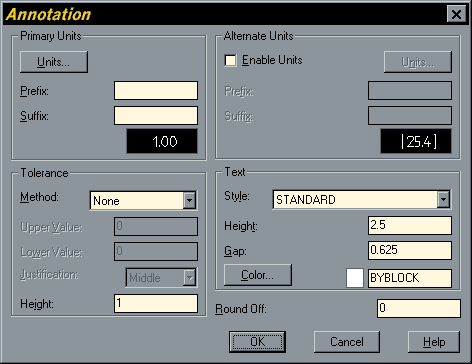 AutoCAD gives you the option to automatically include a unit prefix or suffix with the dimension text. For example, you could set the dimension style in such a way that it created dimensions with "m" to indicate metres after each dimension text. Most usually, dimensions are drawn without units displayed but with a note on the drawing indicating the units used, such as "All dimensions in metres". However, you may have a drawing where different units are being used for different elements of the drawing. In such a case it is a good idea to include units to avoid confusion. Remember that the main idea behind dimensioning is to give the maximum amount of information in the clearest and most concise way. To add units to a dimension style, click on the "Annotation…" button in the Dimension Styles dialogue box and enter the required unit character(s) in the "Prefix" and/or "Suffix" edit boxes of the "Primary Units" area of the dialogue box. For example, if you wanted to display metres, you would type "m" in the "Suffix" edit box.
The Dimension Update Command
| Toolbar | |
| Pull-down | Dimension |
| Keyboard | DIM |
Command Sequence
Command: DIMDim: UPDATE
Select objects: (pick dimension to update)
Select objects: (pick more dimensions or
Dim: (press the escape key, Esc to return to the command prompt)
Tips & Tricks
- Always attempt to use the least number of dimensions in order to provide the maximum amount of information.
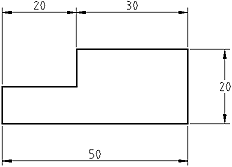 Avoid giving duplicate information. For example, if you use a number of running dimensions along the length of an object, it is not necessary to include an additional dimension for the whole length. In the illustration on the right the "50" dimension is unnecessary because it gives no extra information and simply duplicates that which can be inferred from the "20" and "30" dimensions. This will also avoid any ambiguity which may arise from inaccurate dimensioning.
- Sometimes it may be more appropriate to add notes to your drawing which include dimension information rather than attempt to dimension small or complex items.
- If you do not include any units information with your dimensions you must always add a note to your drawing such as "All dimensions are in millimetres" to make it absolutely clear.
No comments:
Post a Comment